
You're probably in one of three situations right now. You want OpenClaw running on your laptop in the next few minutes. You need it on a server that won't fall over after a reboot. Or you've already realized that a single local install won't cut it once client data, access control, and multiple agents enter the picture.
That's why most OpenClaw install guides feel incomplete. They show the fast command, but they don't help you choose the right install path for the job. A local one-liner is fine for testing prompts, wiring up a model provider, and learning the CLI. It's not the same thing as a stable production deployment, and it definitely isn't a multi-client setup.
The practical question isn't just how to install openclaw. It's where to install it, why that method fits your workload, and what you need to verify before trusting it.
Table of Contents
- Your Pre-Installation Checklist
- The One-Liner Install for Local Development
- Containerized Deployments for Production
- Post-Install Verification and Initial Configuration
- Troubleshooting Common Installation Errors
- Skip the Setup with Donely's AI Workforce Platform
Your Pre-Installation Checklist
The cleanest installs start before you touch the installer. Most failed OpenClaw setups come from bad prerequisites, not bad commands.
| Requirement | What to check | Why it matters |
|---|---|---|
| Operating system | macOS, Linux, or Windows with WSL2 | These are the environments the scripted installer is built to handle cleanly |
| Node.js | Recommended: Node 24. Minimum: 22.16+ | OpenClaw depends on a compatible Node runtime |
| Terminal access | bash shell or WSL2 shell |
The one-line installer runs through shell commands |
| Network access | Outbound internet access during install | Needed for dependencies, onboarding, and provider setup |
| Ports and local policies | Make sure local security tools aren't blocking expected services | A blocked local runtime can look like a failed install |
Check the operating system first
If you're on macOS or Linux, you're on the straightforward path. If you're on Windows, use WSL2 instead of trying to force a native setup. That gives you a Linux userland, cleaner package management, and fewer surprises when the installer configures services and dependencies.
For a fresh Linux machine, do the basic hygiene first. If you're standing up a new box instead of using your daily workstation, this professional guide to Linux server setup is a useful sanity check before you install any agent runtime.
Practical rule: Treat your OpenClaw host like a disposable worker, not a precious pet machine. The cleaner the base system, the easier the install and recovery.
Verify Node.js before anything else
Run:
node --version
If you don't have Node installed, or if the version is old, fix that first. Community benchmarks show that 45% of installation failures are caused by Node.js version mismatches, and the recommendation is Node 24, with 22.16+ as the minimum according to this OpenClaw install walkthrough on YouTube.
If you've been juggling multiple Node projects on the same machine, version drift is common. In practice, that's where a lot of “the install ran but nothing works” reports come from. The installer can help, but I still prefer knowing the host is clean before I start.
Think about the machine role
A laptop for testing and a server for always-on automation are different environments. On a local machine, convenience wins. On a server, repeatability and isolation matter more.
If you're still deciding whether OpenClaw belongs on your own machine or in a managed environment, this comparison of OpenAI Superapp vs OpenClaw deployment trade-offs is a useful framing tool.
Use this checklist before every first install:
- Confirm shell access: Use a terminal where
curlandbashwork normally. - Check Node now: Don't assume your machine's global Node version is compatible.
- Prefer WSL2 on Windows: It saves time compared with fighting native Windows edge cases.
- Start on a clean host when possible: Old package managers and leftover global npm installs create messy failures.
The One-Liner Install for Local Development
If your goal is to get OpenClaw running fast on a laptop, dev box, or WSL2 environment, use the official installer.
curl -fsSL https://openclaw.ai/install.sh | bash
That command is the quickest path for local development because it handles the ugly parts for you. As of Q1 2026, the official install script has been used for over 500,000 global installations, with a 95% first-time success rate and average setup in under 30 seconds on a compatible system, according to this OpenClaw installation and setup guide.
What the installer does behind the scenes
This isn't just a package download. The script typically handles several setup tasks in one pass:
- Environment detection: It figures out whether you're on macOS, Linux, or WSL2.
- Runtime prep: It checks for Node and related tooling, then installs what's missing.
- Binary and package deployment: It puts the OpenClaw components where they need to live.
- Interactive onboarding: It launches the initial configuration flow after install.
That last step matters. The installer gets the software onto the machine, but the onboarding wizard turns it into a usable agent runtime.
What you'll see during onboarding
Expect prompts around a few core choices.
Gateway configuration usually defaults to a local address and standard runtime port. For a first setup, keep the default unless you already know you have a conflict.
Authentication and model provider setup is where most new users slow down. OpenClaw needs credentials for the model provider you want it to use. Have those ready before you start, especially if your provider requires a copy-paste key or browser auth flow.
Optional skills can wait. I recommend skipping anything nonessential on day one. Get the base runtime healthy first, then add capabilities once you know the install is stable.
A good first install is boring. If you're changing ports, adding extra skills, and tweaking shell behavior during onboarding, you're creating your own debugging session.
A quick visual walkthrough helps if you want to see the flow before running it:
When the one-liner is the right choice
Use the scripted installer when you need to:
- Prototype quickly: You want an agent running today, not a hardened environment.
- Learn the CLI: The local install is the best way to understand commands and defaults.
- Test provider connectivity: You need to verify API keys, channels, or a gateway locally.
- Validate a machine concept: For example, whether a small dedicated desktop or mini server is worth using long term.
If you're exploring dedicated hardware for a persistent local agent, this Mac mini AI server breakdown is a practical next read.
What doesn't work well with this method
The one-liner is not a production strategy by itself. It's tied to the host, shares that host's package state, and inherits whatever weirdness already lives on the machine. That's fine for development. It's a weak foundation for team handoff, repeatable deployments, or isolated client workloads.
Containerized Deployments for Production
Once OpenClaw moves beyond a personal dev environment, I stop thinking in terms of “installing it on a machine” and start thinking in terms of packaging a known-good runtime. That's where containers help.
A containerized deployment gives you a cleaner contract. The app, its dependencies, and its startup behavior are defined together. You're not depending on whatever happens to be installed globally on the host.
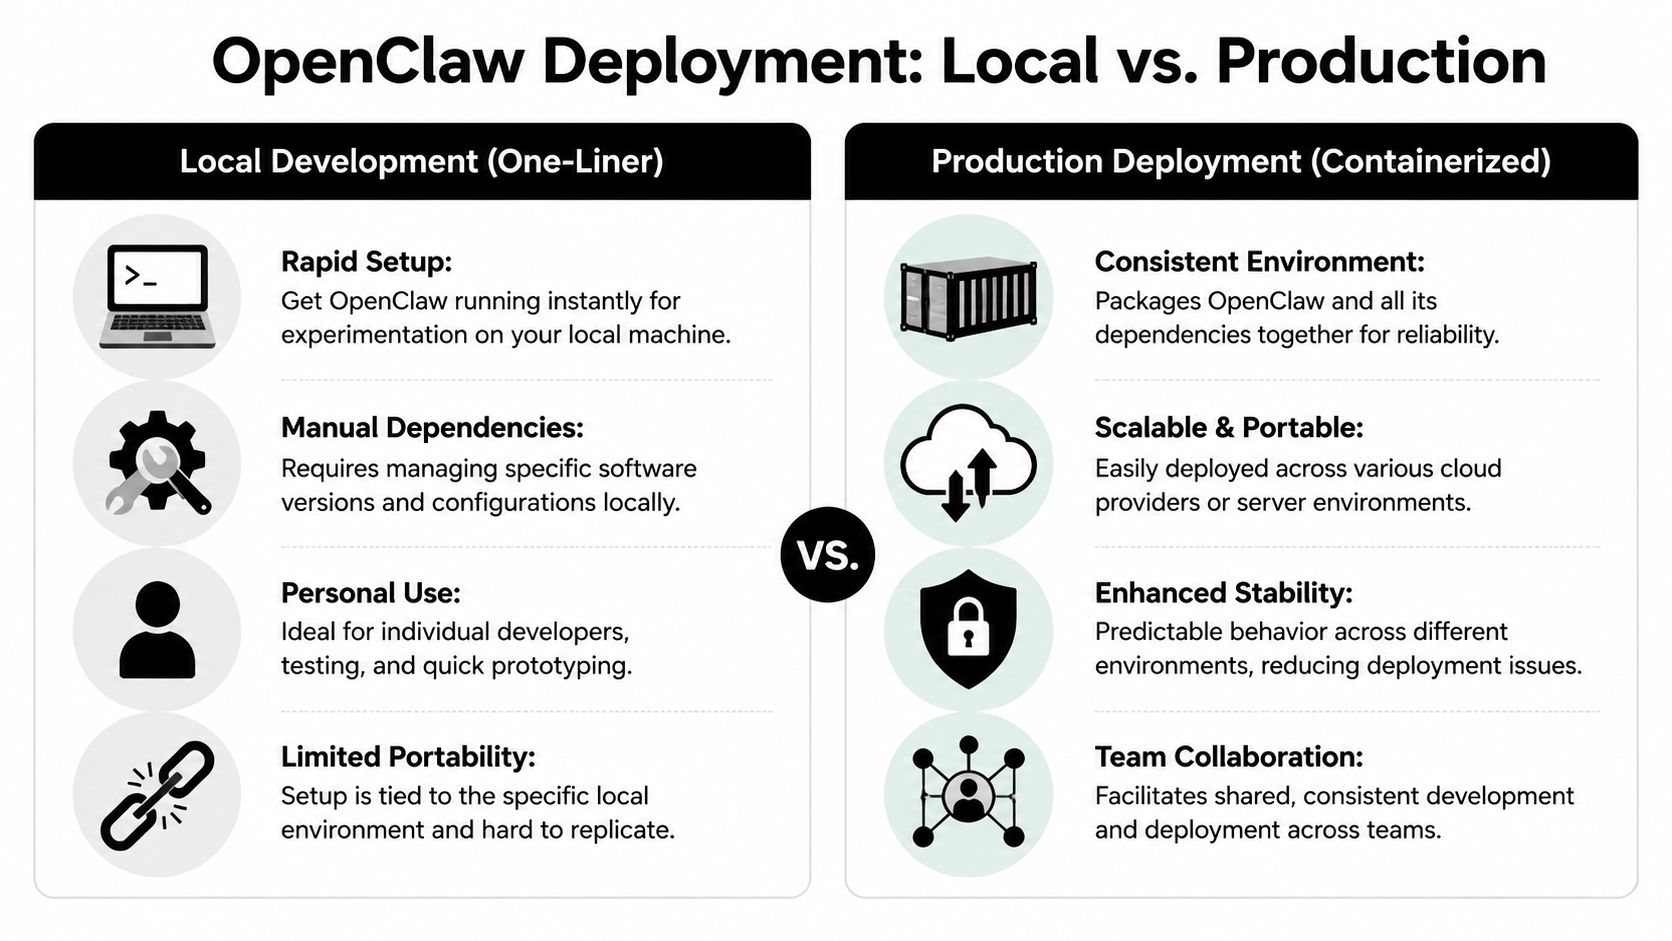
Local install versus containerized runtime
Here's the trade-off in plain terms.
| Approach | Strength | Weak spot | Best fit |
|---|---|---|---|
| Local one-liner | Fast setup and easy onboarding | Host dependency drift | Solo testing and short-lived experiments |
| Containerized deployment | Reproducible environment | More setup work upfront | Stable servers, team workflows, repeatable deploys |
A local install is great for proving OpenClaw works. A container is better when another engineer has to reproduce the same setup next week on another host.
A practical Docker Compose starting point
If you're comfortable with Docker, start with Compose. Keep the first version simple, persist data, and avoid overengineering the network.
services:
  openclaw:
    image: openclaw/openclaw:latest
    container_name: openclaw
    restart: unless-stopped
    ports:
      - "3000:3000"
    environment:
      OPENCLAW_GATEWAY_HOST: 0.0.0.0
      OPENCLAW_GATEWAY_PORT: 3000
    volumes:
      - openclaw_data:/var/lib/openclaw
      - openclaw_config:/etc/openclaw

volumes:
  openclaw_data:
  openclaw_config:
This pattern gives you three useful things immediately:
- Persistence: Config and working data survive container restarts.
- Predictable startup:
restart: unless-stoppedgets you back online after host reboots. - Port clarity: You know exactly what service exposure you've created.
What production teams usually miss
The hard part isn't getting one container to start. The hard part is everything around it. Logs, backups, secrets, updates, user access, and isolated environments all matter once the runtime handles real work.
That's where many teams should pause and review their cloud posture first. Before putting OpenClaw into a broader deployment pipeline, a check like IT Cloud Global's Houston cloud audit services is useful because it forces the right questions around security boundaries, cost controls, and operational blind spots.
If your production plan is “we'll just SSH in and fix it,” you don't have a production plan yet.
When to stop at Docker and when to go further
Docker Compose is enough when one team owns one runtime or a small set of runtimes. It's often the right middle ground for internal tools, small agencies, or pilot environments.
If you need scheduling, stronger service orchestration, or a larger fleet, Kubernetes is the next step. But don't jump there just because it sounds more serious. Most OpenClaw production issues start with environment design, not with a missing cluster.
If your path is a hosted server rather than a local machine, this guide on installing OpenClaw on a VPS is the more direct next move.
Post-Install Verification and Initial Configuration
A finished installer doesn't prove you have a healthy runtime. It only proves the script completed. The first commands you run after installation tell you whether OpenClaw is usable.
Run the doctor first
Start here:
openclaw doctor
This is the single most useful post-install command. Official telemetry says openclaw doctor can automatically diagnose and suggest fixes for 87% of common post-install configuration issues, which is why it should be your first check after install, according to the OpenClaw install documentation.
A healthy result usually looks like this in broad terms:
✓ configuration found
✓ gateway settings valid
✓ required dependencies available
✓ authentication checks passed
A bad result usually points you toward one missing piece, not ten. That's what you want. Clear failures are easier to fix than vague partial success.
Confirm the runtime is up
Next, check the gateway:
openclaw gateway status
You want to see that the runtime is active and listening normally. If the gateway isn't running, don't start changing model settings yet. Fix runtime health first.
I also like to verify the installed version so I know exactly what I'm debugging:
openclaw --version
Finish the minimum configuration
Once the runtime checks are clean, set the essentials and stop there.
Add your model provider credentials
OpenClaw needs working authentication for the provider you plan to use. Store those credentials through the supported configuration flow, not in random shell history or ad hoc text files.
Confirm the gateway endpoint
If you changed defaults during onboarding, verify those values now while the install is fresh in your head.
Install one skill, not five
If you want to test capability installation, use a single Clawhub skill first:
/install clawhub/skill-nameRe-run health checks after changes
Don't assume a good base install stays good after config edits.
A stable OpenClaw node is one where verification still passes after you add credentials and the first skill. That's the point where I consider the install real.
Good signs and bad signs
Use this quick read of the room:
- Good: doctor passes, gateway is up, version is readable, onboarding choices are reflected correctly.
- Bad: command hangs, gateway reports down, or auth fails immediately after key entry.
- Also bad: you can't tell where config lives or what changed during onboarding.
If anything is unclear at this stage, pause. Don't layer more integrations on top of an uncertain base.
Troubleshooting Common Installation Errors
OpenClaw failures usually cluster into a few predictable buckets. The fastest way to recover is to identify the symptom, map it to the likely cause, and make one controlled fix at a time.
libvips errors on ARM
Symptom
Install fails on a Raspberry Pi or another ARM device with Sharp or libvips related messages.
Likely cause
The image-processing dependency chain on ARM can be messy, especially when the host has conflicting native libraries.
Solution
Run:
SHARP_IGNORE_GLOBAL_LIBVIPS=1 npm install -g openclaw@latest
On ARM devices such as Raspberry Pi systems, this fix addresses 30% of ARM-specific installation failures, based on the community benchmark data cited earlier in the pre-install guidance.
OpenClaw installs but won't start cleanly
Symptom
The install appears to finish, but startup commands fail, hang, or return inconsistent runtime errors.
Likely cause
In practice, this often traces back to prerequisites that were technically present but not compatible. The most common offender is the Node runtime.
Solution
Check your Node version again:
node --version
If the version is outside the recommended range, correct it before reinstalling or re-running onboarding. Don't chase downstream errors until the runtime base is right.
Port conflict or gateway bind failure
Symptom
You see a bind error, a gateway startup failure, or the service reports that the configured port is already in use.
Likely cause
Another local service is already using the same port, or an earlier failed OpenClaw process didn't exit cleanly.
Solution
Pick one action, not three:
- Inspect what else is running: Check whether another service already owns the expected port.
- Stop the conflicting process: If it's a stale local service, terminate it cleanly.
- Change the gateway setting: If the host already uses that port for another tool, reconfigure OpenClaw to use a different one and verify again.
Daemon starts badly or not at all
Symptom
The runtime works when started manually, but not as a background service after reboot or logout.
Likely cause
The daemon wasn't installed cleanly, or the service manager is using outdated config from an earlier attempt.
Solution
Re-run the daemon install path and then validate service health again. Keep the sequence simple:
openclaw onboard --install-daemon
openclaw gateway status
Don't debug five layers at once. If the manual process works and the daemon doesn't, the problem is service management, not the whole install.
API key pasted correctly but auth still fails
Symptom
You enter a provider key and still get immediate authentication or provider connection problems.
Likely cause
The value may be valid but stored in the wrong config scope, copied with extra characters, or paired with the wrong provider selection.
Solution
Re-enter the key carefully through the normal config flow, then run the verification commands again. If you changed more than one thing at once, back up and test the smallest possible config.
Skip the Setup with Donely's AI Workforce Platform
There's a point where learning how to install openclaw stops being the hard part. Operating it becomes the hard part.
That usually happens when one local instance turns into several isolated workloads. A founder wants one agent for internal ops and another for customer work. An agency needs separate environments for each client. A compliance-minded team needs access controls, logs, and cleaner data boundaries than a personal laptop can provide.
Where manual installs start to break down
Single-device installs are well covered. The bigger gap is what happens after that. Most tutorials stay focused on one machine, one runtime, and one operator.
That leaves real production concerns hanging in the air. Most tutorials focus on single-device installs, which creates a gap for production use and leaves teams needing isolated instances, RBAC, centralized monitoring, and HIPAA-ready architecture, as noted in the OpenClaw tutorial discussion of deployment gaps.
If you've worked with agencies or implementation partners before, you've seen this pattern in other stacks too. The coordination problem becomes bigger than the software install itself. This blockchain outsourcing guide by Blocsys Technologies is about a different domain, but the operating model is familiar. Multiple stakeholders, fragmented ownership, and the need for clean execution boundaries.
The before and after of managed deployment
Instead of managing Node versions, shell environments, and local service files, you move to a system where the runtime is provisioned as an isolated instance.
Instead of tracking logs per machine, you use a central dashboard.
Instead of explaining to every client why their workload shares a host with another experiment, you separate environments by design.

One option in that category is Donely. It provides a managed way to host and operate OpenClaw-powered instances from a single dashboard, with isolated environments, centralized monitoring, audit logs, per-instance RBAC, and integrations across a large tool set. That's a different job than the local installer. It's aimed at teams that don't want to own the DevOps layer for every agent they deploy.
When to choose this path
A managed platform makes sense when your bottleneck is no longer installation speed. It makes sense when your bottleneck is operational drag.
Choose that route if these sound familiar:
- You support multiple clients: Each client needs separation in data, access, and billing.
- Your team isn't a DevOps team: You want agents running, not another infrastructure surface to maintain.
- You need governance: Access rules, audit visibility, and predictable environments matter more than shell-level control.
- You expect growth: One instance today often becomes several once the first use case works.
The local install is still worth learning. It teaches you how OpenClaw behaves. But if your real problem is running many instances safely and keeping them manageable, the answer usually isn't another bash script.
If you want OpenClaw without the install and infrastructure work, Donely gives you a direct path to launch and manage isolated AI employee instances from one dashboard. It's the simpler fit when your priority is deployment speed, operational control, and scaling beyond a single local setup.